Tech Support
If you are an SCIS student, faculty or staff and need technical support please feel free to contact us.
– OR –
CASE 258 (9AM to 5PM Monday -Friday)
But, Please feel free to look at our FAQs below.
Account Information
It takes me a long time to login to the Windows PCs. What can I do to fix this?
The Knight Foundation School of Computing and Information Sciences we use roaming profiles. Roaming profiles allow a user’s desktop and application settings to follow them no matter which workstation they login to on the domain. This roaming profile is downloaded to the computer when you login and uploaded back to the server when you log off. The reason it takes you a long time to login is because you have a lot of data in your roaming profile.
Your roaming profile lives in a hidden directory in your home directory called “.ad-profile-win7”. In Windows, C:\Users\ is your Roaming Profile. The most common culprits for slow logins are Dropbox and virtual machines. When installed incorrectly, these can add numerous gigabytes worth of data to your roaming profile which translates to a substantial login time.
The contents of this folder should not be modified while you are logged into a Windows PC. You will need to SSH into one of our Unix servers and move or delete the offending folders and or files from your roaming profile.
How do I change my Windows password?
Once your logged in, press CTRL + ALT + DELETE and select the option that says “Change a password”.
How do I change my Linux password?
Once your logged in, open a terminal and type ‘yppasswd’.
I already have an FIU email account. Why do I need a Knight Foundation School of Computing and Information Sciences email account?
All official correspondence from the Knight Foundation School of Computing and Information Sciences will be sent to your Knight Foundation School of Computing and Information Sciences email account.
How do I check my Knight Foundation School of Computing and Information Sciences email?
Faculy can visit http://mail.cs.fiu.edu to check their mail on a web browser, however, we recommend you setup your mail account on a mail client such as Mozilla Thunderbird.
Mail server configuration
Incoming mail server
Connection Security: SSL
Port: 993
Outgoing mail server
Connection Security: STARTTLS
Port: 587
How can I forward mail to my @cs.fiu.edu account somewhere else?
You can use procmail to do this (see below) but there is a simple way. Create a file in your home directory (U drive) called .forward (it starts with a dot, so it a hidden file) in that file you place the email address(s) you want your email to forward to.
If you are remote, you can login to wolf.cs.fiu.edu to do this.
I do not know or have forgotten my password
Send an email to request@cis.fiu.edu and the staff can assist you with resetting your password.
Setting up Procmail on your FIU-SCIS Account
Introduction
Procmail is a tool that is designed to filter your mail. In other words, it permits you to send your Email to different locations depending on its content. This is very handy because you can use it to do things like:
- Split mail from different places into different folders
- Delete mail from undesireable sources
- Forward certain email to a script to process it further
- Forward certain email to another address so you can read it elsewhere
- and much more
Setting up Procmail
In the past, you used to have to use a “.forward” file to use procmail. You no longer have to do this, since *ALL* email is delivered using procmail. The only file you have to worry about is your .procmailrc file, which is located in your UNIX home directory. The first step is to create a mail directory inside your home directory, if you don’t already have one. Just type, in UNIX:
mkdir mail
chmod 700 mail
The chmod command keeps other people from poking around in your mail directory, but allows you to access it. The second step is to actually create the file. For instance, in UNIX, type:
(or emacs, or vi, or whatever editor you want; pico is easiest for beginners, though) Then, paste in the following. This is the procmail header, which defines various operating parameters.
PATH=$HOME/bin:/usr/bin:/usr/ucb:/bin:/usr/local/bin:.
MAILDIR=$HOME/mail # Make sure it exists
DEFAULT=/var/mail/$LOGNAME
VERBOSE=off
LOCKFILE=/var/mail/.proclock.$LOGNAME
LOGFILE=$MAILDIR/.procmail.log
# Recipes go here
#
# .procmailrc ends here
Procmail automatically replaces “$LOGNAME” with your username and “$HOME” with your home directory. The LOCKFILE is used by procmail to keep two different procmail processes from accessing your mailbox at the same time, causing corruption. The LOGFILE contains a log of procmail transactions; this is handy if something is not working and you want to find out why. DEFAULT specifies the destination of all Email that does not match any recipies. Since there are no recipes yet, all your incoming email will go to DEFAULT, which is your mail spool.
Creating Recipes
A recipe is a rule that tells procmail what to do with a particular Email. Recipes must be placed after the header in your .procmailrc file, IE, after the “Recipes go here” comment in the above example. Here are some examples of useful recipes. Let’s say we have a jerk with the Email address “jerk@microsoft.com” who is sending you lots of annoying Email, and you want to stop seeing the messages. This recipe will do that:
:1
^From.*jerk\@microsoft\.com.*
/dev/null
# End procmail recipe
Explanation:
[First Line] :1
There is always a : on the first line of every recipe. The number (in this case 1) after the : specifies how many rules follow for this recipe. All the rules must match for the recipe to take the message.
[Second Line] ^From.*jerk\@microsoft\.com.*
This line will match any Email that contains the above text. Since the From header is integral to most Emails, and contains the sender’s Email address, that line will match messages from “jerk@microsoft.com”. The line is a regular expression, so standard UNIX regular expression syntax applies.
[Third Line] /dev/null
The last line in a recipe tells procmail what file to send the message to. It is called the “action line”. In this case, we’re sending the message to /dev/null, which is the “bit bucket”, all data sent there is deleted. Remember that jerk@microsoft.com could always change his email address, or find another ISP. This won’t necessarily stop someone from harassing you. It is best to not brag about the filter; if the person doesn’t know his email is being deleted, he will likely continue sending the messages and wonder why you aren’t replying!
Example: Carbon Copies
Let’s say you want to do something with a message, like file it away, but still want the message to continue being processed by the remaining recipes. To do this, add a “c” after the number in the : line. For instance:
:1 c
^From.*pelina\@cs\.fiu\.edu.*
/homes/$LOGNAME/mail/pelina
# End procmail recipe
The above recipe will save a CARBON COPY of all messages from pelina@cis.fiu.edu to the “pelina” mail spool file, and the message will still be delivered to your INBOX, provided there are no more recipes after this one that match that message and do something else with it.
Example: Forwarding
You can also use procmail to forward your mail. Say you get a lot of personal email at your school address from friend@yahoo.com, and you don’t want it distracting you at work. You can quietly forward that to your personal email (say it’s guru@foo.org) with a rule like this:
:1
^From.*friend\@yahoo\.com.*
! guru@foo.org
# End procmail recipe
The “!” in the action line tells procmail to send the message to that address.
Example: Filing certain messages into folders
Here is another example of a procmail recipe; this one will take all messages from pelina@cis.fiu.edu and place them in the mail folder “pelina”.
:1
^From.*pelina\@cs\.fiu\.edu.*
/homes/$LOGNAME/mail/pelina
# End procmail recipe
Since $LOGNAME is replaced by your username, messages from pelina@cis.fiu.edu will be stored in the mail spool file “/homes/username/mail/pelina”, which you can access from pine and/or imap.
Going on Vacation? Here is how to setup your vacation mailer.
If you will be away from the office for a while, you can set up vacation mode. This means that anyone who emails you will receive a message telling them that you are on vacation and will read your mail when you get back.
Setting up vacation mode requires minor UNIX usage; if you are not familiar with UNIX, we would be happy to set this up for you; simply E-mail us at request@cs.fiu.edu. There are two ways to set up vacation mode. The simplest way is to just use the “vacation” command. However, if you have a complex .procmailrc file (and you will know if you do), you may want to use the .procmailrc method.
vacation command
SSH into wolf.cs.fiu.edu and run command:
You will be presented with a text editor containing a default vacation message. Edit it to your tastes, then save the message. That’s it! Vacation mode is now set up. Feel free to test it by sending an E-mail to yourself; you should get an immediate response with your vacation message.
When you return, to turn off vacation mode, simply ssh into UNIX and type:
This will remove the vacation script from your .forward file and return you to normal mail processing.
The .procmailrc method
If you have a .procmailrc file to sort your E-mail, you will want to use this method. It will work the same way for folks that E-mail you, but your mail sorting will be preserved. To set this up, simply add this section before the first rule in your .procmailrc file:
# vacation handler
#
:0 Whc:.vacation.lock
*!^FROM_DAEMON
*!^X-loopity-loop: yourusername@cs.fiu.edu
*^TOyourusername.*
| formail -rD 8192 $HOME/.vacation.cache
:0 ehc
| ( formail -rA”Precedence: Junk” \
-A”X-loopity-loop: yourusername@cs.fiu.edu”;\
cat $HOME/vacation-message.txt ) | /usr/lib/sendmail -oi -t
Replace all instances of ‘yourusername’ with your actual SCS username. Then, edit the file vacation-message.txt in your home directory, and place your vacation message in it. That’s all there is to it! Vacation mode is now set up. When you return from vacation, simply edit your .procmailrc file and remove or comment out the above section, and delete the file ~/.vacation.cache and you will return to normal mail processing.
Accessing your files off campus
SSH
Windows: Windows users need to download an SSH client first. Students can obtain a free SSH client called PuTTY from http://www.chiark.greenend.org.uk/~sgtatham/putty Once you have downloaded and installed PuTTY, connect using the following:
Port: 22 Click ‘Open’. Once you have clicked open, you will receive a prompt for your username. Enter your FIU username and press enter. You will then be prompted for your password. Enter your password and press enter.
Note: You may receive a PuTTY security alert saying that the server’s host key is not cached in the registry. Click ‘Yes’ to continue.
Mac: Your Mac comes with an SSH client.
Search for ‘Terminal’ in Spotlight. Once you have opened a terminal, type the following command and press enter: ssh yourUserName@wolf.cis.fiu.edu
Note: You may receive a warning saying that the authenticity of host ‘ocelot.aul.fiu.edu’ can’t be established. Type ‘yes’. You will be prompted for your password. Enter your password and press enter.
Linux: Your Linux OS comes with an SSH client.
Open a terminal and type the following command and press enter: ssh yourUserName@ocelot.aul.fiu.edu
Note: You may receive a warning saying that the authenticity of host ‘wolf.cis.fiu.edu’ can’t be established. Type ‘yes’. You will be prompted for your password. Enter your password and press enter.
SFTP
You may use a graphical tool to remotely access your files off campus.
Windows: Faculty can obtain a free tool called WinSCP from http://winscp.net/eng/index.php
Once you have downloaded and installed WinSCP, run WinSCP and connect to the following host:
Host name: wolf.cis.fiu.edu
Port number: 22
User name: yourUserName
Password: yourPassword
File protocol: SFTP
Click Login
Mac: Faculty can obtain a free tool called Cyberduck from http://cyberduck.io/
Once you have downloaded and installed Cyberduck, run Cyberduck and connect to the following host:
Host name: wolf.cis.fiu.edu
Port number: 22
User name: yourUserName
Password: yourPassword
File protocol: SFTP
Linux: GNOME users can use Nautilus. Click Places > Connect to Server and choose SSH -OR- download FileZilla
Port number: 22
User name: yourUserName
Password: yourPassword
My login credentials do not work
Make sure you are using your Unix credentials and not your Windows credentials. If you have not logged in to a Unix server before, your username is your FIU username. Your FIU username is the first part of your email address before the ‘@fiu.edu’ and in the form: jdoe001.
If you do not know your FIU username, log into MyFIU, select Main Menu > Campus Solutions Self Service > Campus Personal Information > Email Addresses. You will see your ‘Campus’ email address in the form: jdoe001@fiu.edu. The characters before ‘@fiu.edu’ is your FIU username.
Your initial password is the first initial of your first name, followed by your Panther ID, and the first initial of your last name.
For example: A faculty member named ‘John Doe’ with a Panther ID of ‘1234567’ would be ‘j1234567d’.
VPN
VPN Accounts
VPN accounts are offered for faculty members to connect to the Knight Foundation School of Computing and Information Sciences department network and work remotely. In some special cases, graduate students who show a need for a VPN account may be granted one with prior approval by their sponsoring faculty. If you would like to request a VPN account, send a request to request@cis.fiu.edu
[su_tabs]
[su_tab title=”Windows NT” disabled=”no” anchor=”” url=”” target=”blank” class=””]
Windows NT
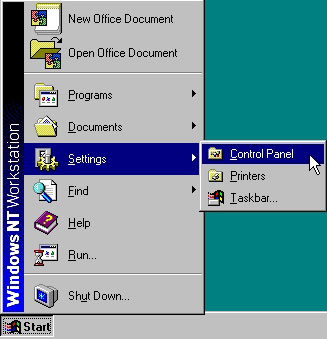
Click on “Start”, “Settings”, and select “Control Panel”
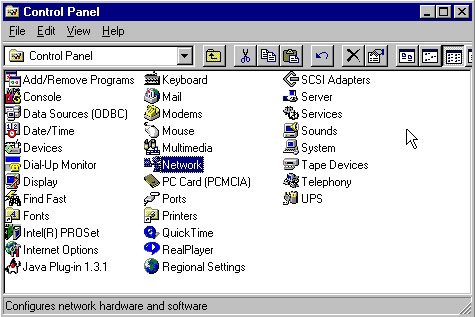
Open up “Network”
Select the “Protocols” tab and then click on “Add…”
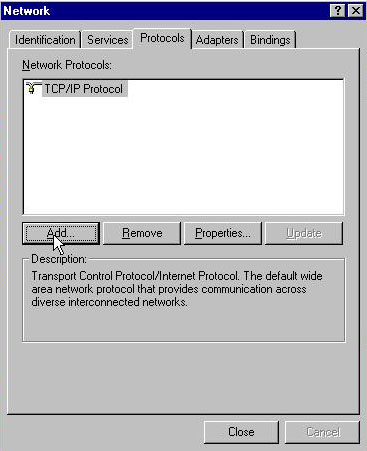
From the list select “Point to Point Tunneling Protocol” then click on “OK”

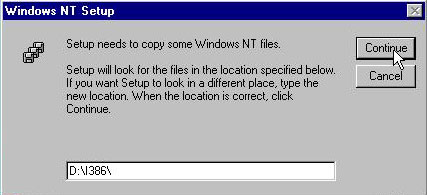
Insert the Windows NT 4.0 Workstation CD in the drive and in the text box type “<cd-rom drive>:\i386” then click on “Continue”
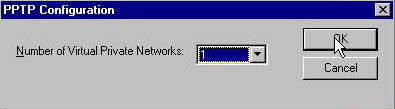
From the drop down box in the “PPTP Configuration” screen select “1” for “Number of Virtual Private Networks” then click on “OK”
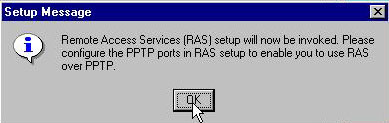
In the “Setup Message” dialog click on “OK”
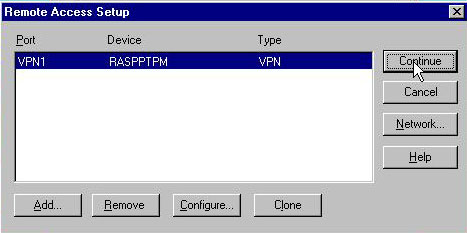
In the “Remote Access Setup” click on “Continue”
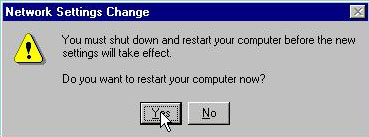
In the “Network” click on “Close”

Restart the machine
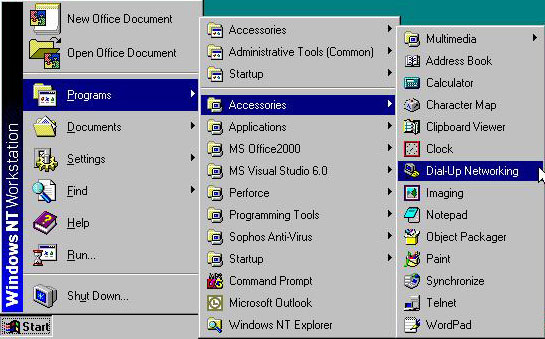
When the machine is back up click on “Start”, “Programs”, “Accessories”, then select “Dial-up Networking”
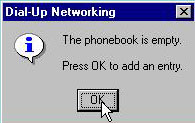
If you didn’t have any entries in the phone book click on “OK” otherwise click on “New…”
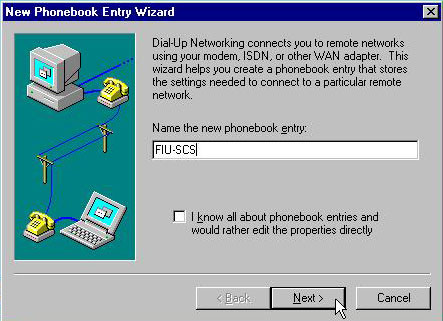
Type in the name that you want to call the connection then click on “Next”
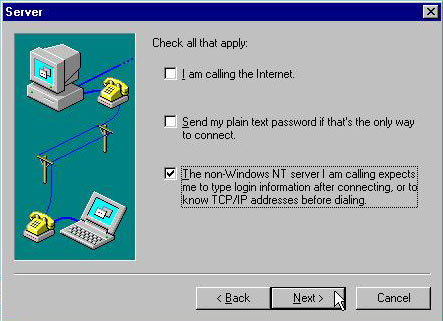
Select “The non-Windows NT server I am calling expects me to type login information after connecting, or to know TCP/IP address before dialing” and click on “Next”
Enter “vpn.cis.fiu.edu” in the text box for the phone number and click on “Next”

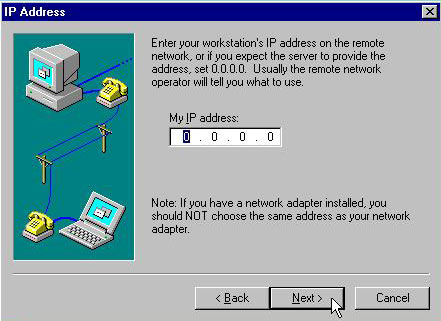
Click on “Next” in the “IP Address” screen without changing anything
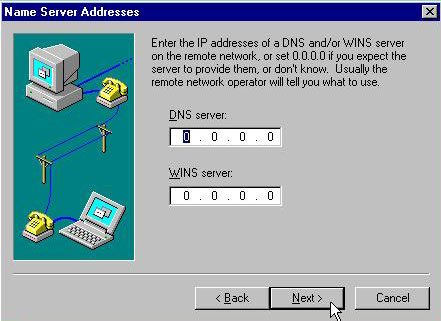
Click on “Next” in the “Name Server Addresses” screen without changing anything
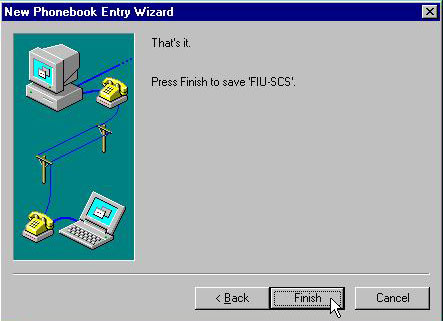
Click on “Finish”
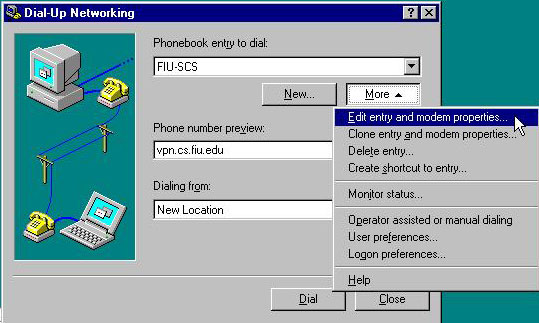
In the “Dial-UP Networking” dialog box click on “More” and select “Edit entry and modem properties…”
Select the “Server” tab and then click on the “TCP/IP Setting”
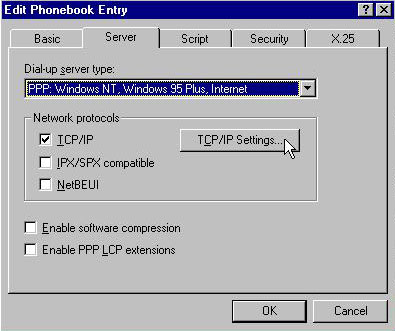
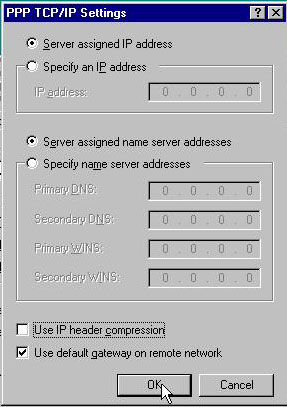
Uncheck “Use IP header compression” then click on “OK”
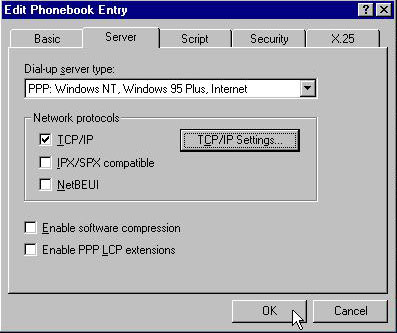
In the “Edit Phonebook Entry” click on “OK”
Click on “Dial”
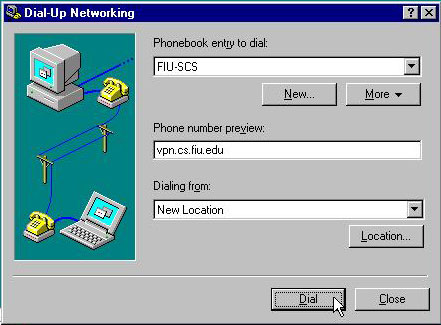
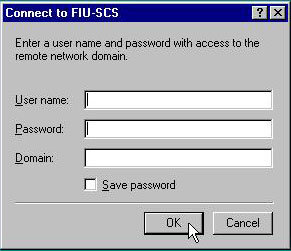
Enter your assigned user name and password with Leaving the “Domain” text box empty and then click on “OK”
[/su_tab]
[su_tab title=”Windows 2000″ disabled=”no” anchor=”” url=”” target=”blank” class=””]
Windows 2000
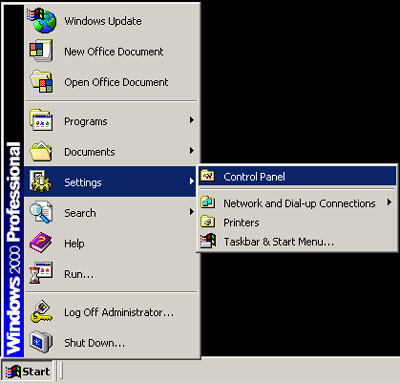
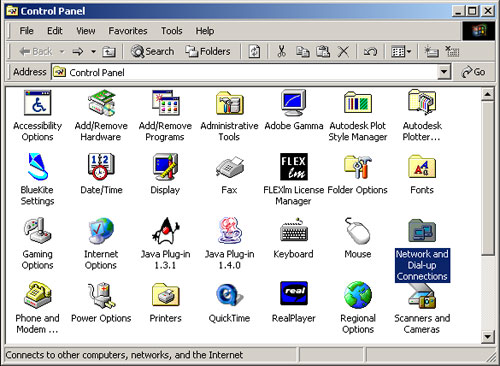
Click on “Start”, “Settings”, and select “Control Panel”
Open up “Network Connections”
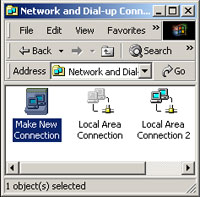
Open up “Make New Connection” then click on “Next”
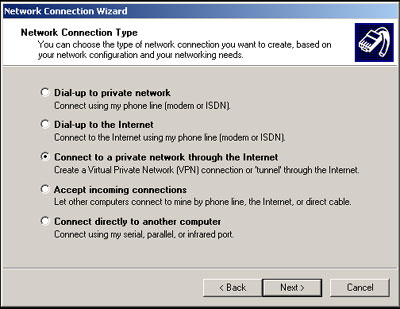
Select “Connect to a private network through the Internet” and click on “Next”
Enter “vpn.cis.fiu.edu” in the text box and click on “Next”

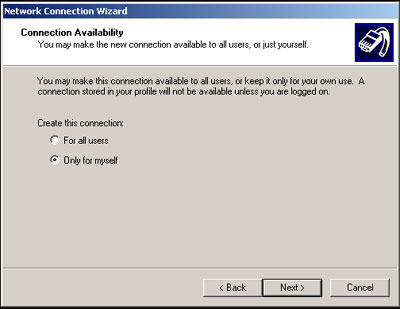
Select whether you want to create the connection for all users or just your self then click on “Next”
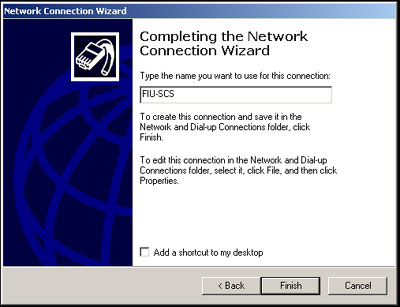
Enter the name that you want to call the connection and click on “Finish”
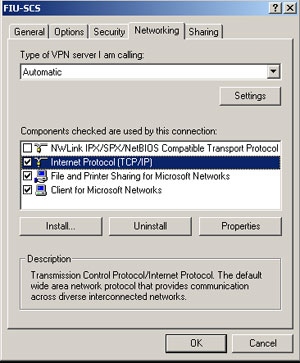
Click on “Properties” and select the “Networking” tab

Uncheck everything except for “Internet Protocol (TCP/IP)” then click on OK
When connecting enter your assigned username and password and click on “Connect”
[/su_tab]
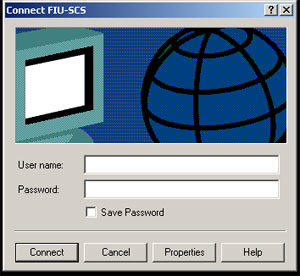
[su_tab title=”Windows XP” disabled=”no” anchor=”” url=”” target=”blank” class=””]
Windows XP Professional
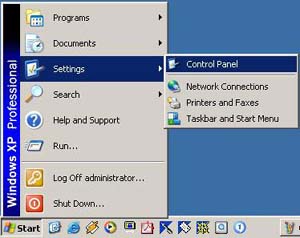
Click on “Start”, “Settings”, and select “Control Panel”
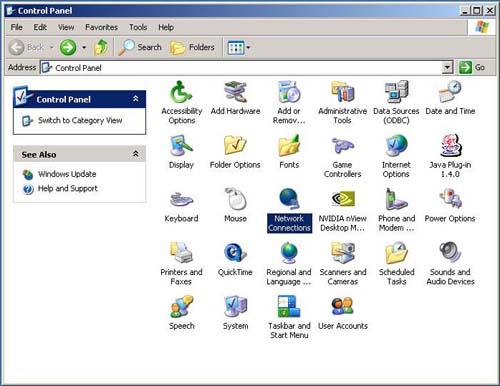
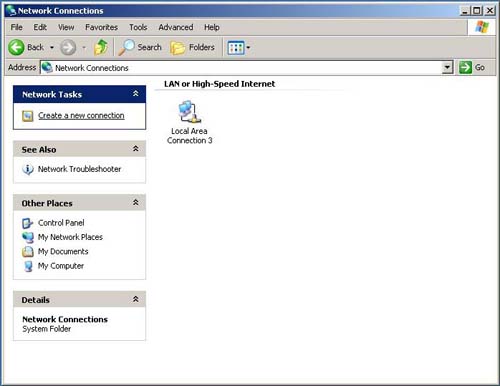
Open up “Network Connections”
Open up “Make New Connection” then click on “Next”
Select “Connect to the network at my workplace” and click on “Next”
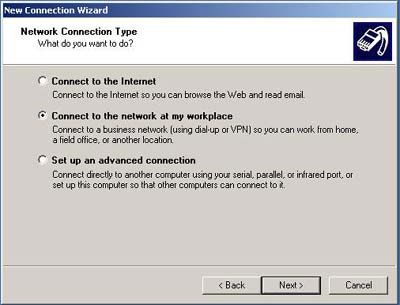
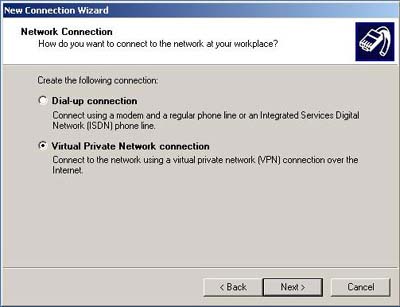
Select “Virtual Private Network connection” and click on “Next”
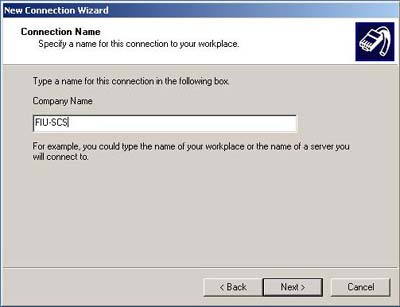
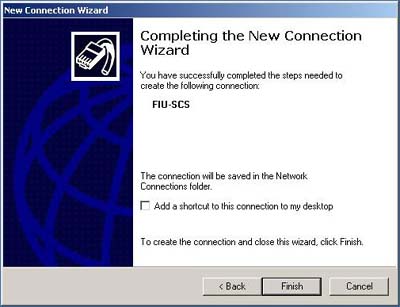
Enter the name that you want to call the connection and click on “Next”
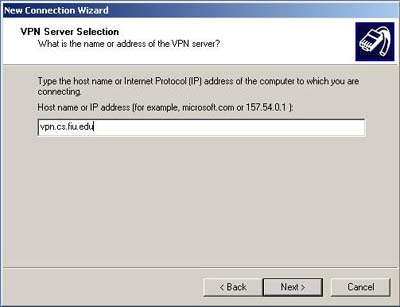
Enter “vpn.cis.fiu.edu” in the text box and click on “Next”
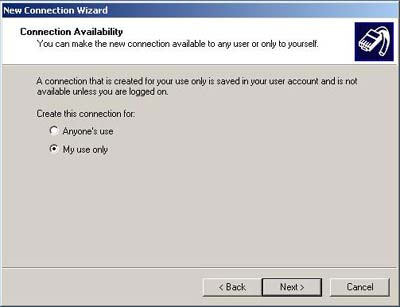
Select whether you want to create the connection for anyone’s use or just your use then click on “Next”
Click on “Finish”
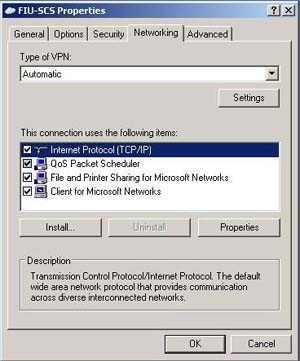
Click on “Properties” and select the “Networking” tab

Uncheck everything except for “Internet Protocol (TCP/IP)” then click on OK
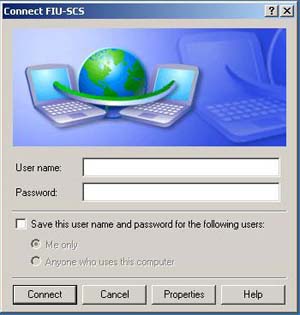
When connecting enter your assigned username and password and click on “Connect”
[/su_tab]
[su_tab title=”Windows 7″ disabled=”no” anchor=”” url=”” target=”blank” class=””]
Windows 7
-
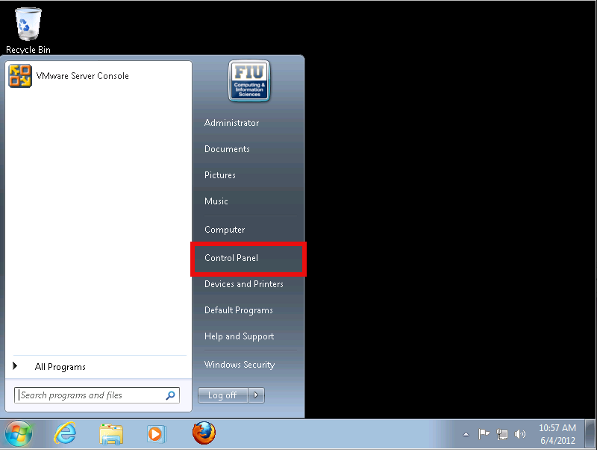
- Click on Start and go to the Control Panel
-
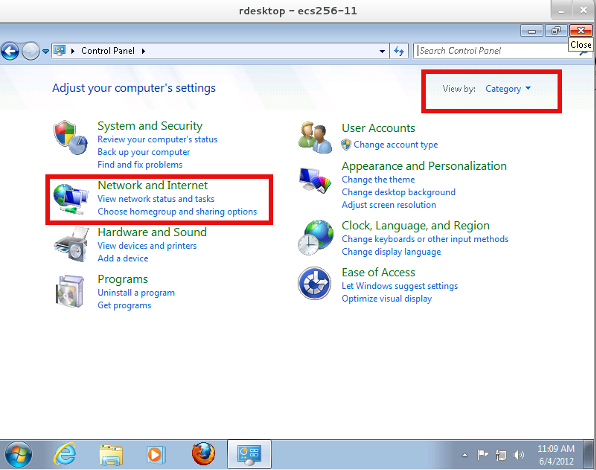
- Click on View by and select the items to display as a Category
-
-
- Click on the Network and Internet title
-
-
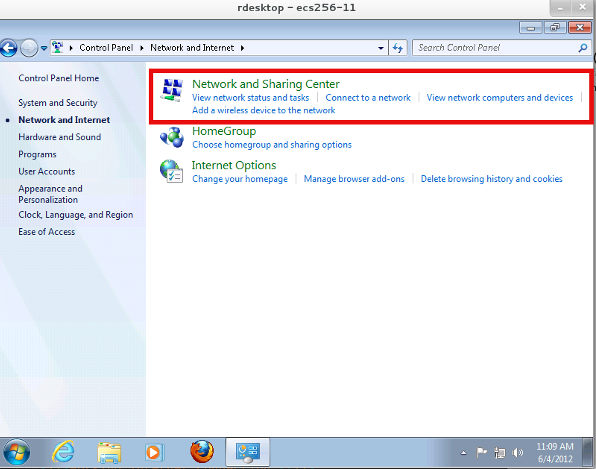
- Click on Network and Sharing Center
-
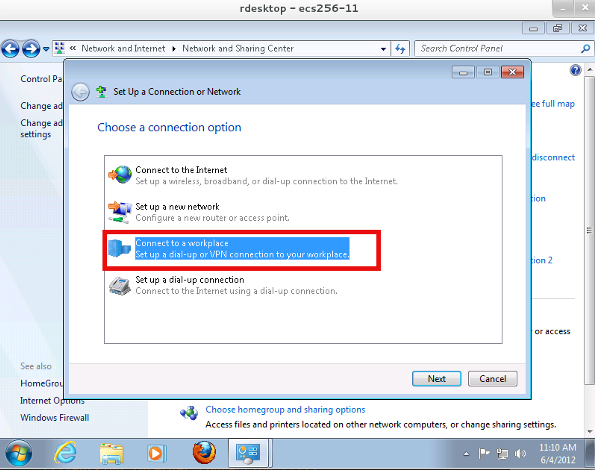
- Click on Connect to a network

-
- Click on Connect to a workplace
-
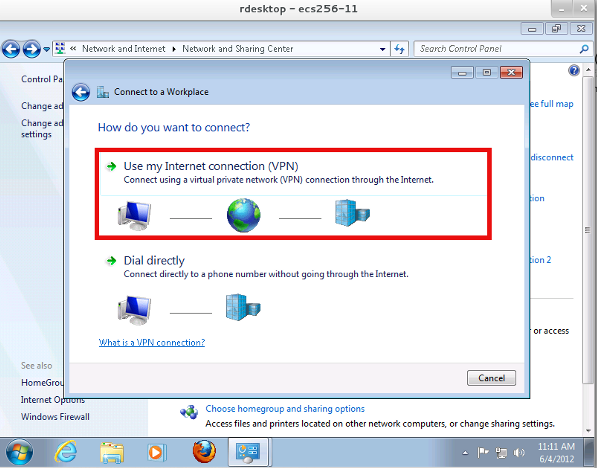
- Click on Use my Internet Connection (VPN)
-
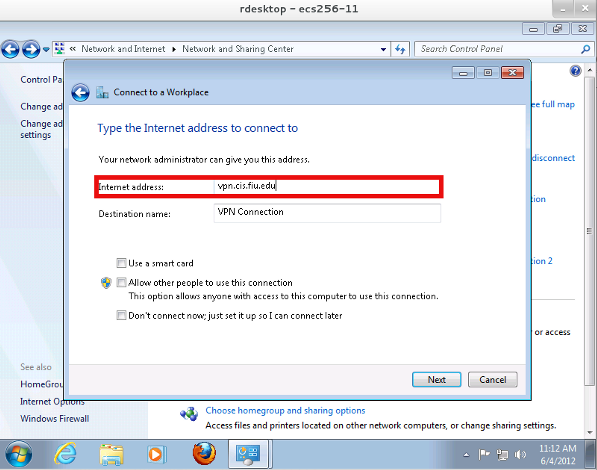
- Enter vpn.cis.fiu.edu under the Internet Address field
-
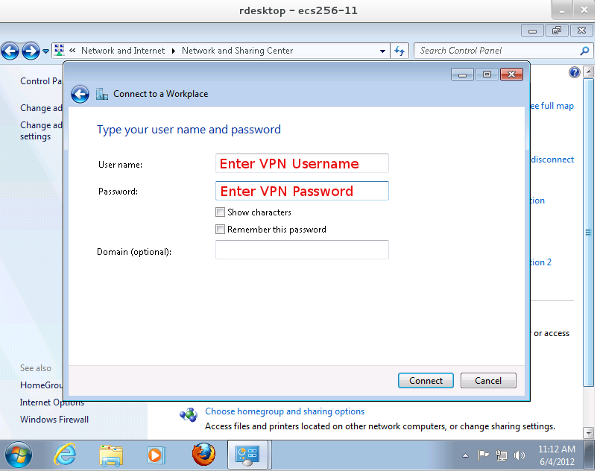
- Enter your username/password for your VPN account
- You must already have a VPN account. Your CS(.fiu.edu) email username/password is not the same credentials used to log in. If you need a account please email request.cs.fiu.edu
- Enter your username/password for your VPN account
-
- Finish!
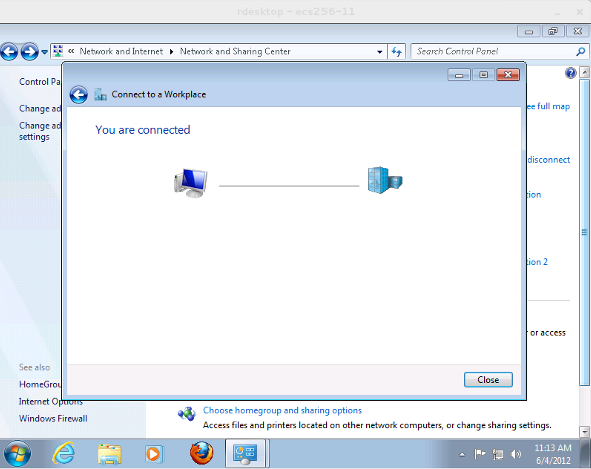
If you encounter any problems send an email to request@cs.fiu.edu OR drop by CASE room 258
[/su_tab]
[su_tab title=”Windows 10″ disabled=”no” anchor=”” url=”” target=”blank” class=””]
Windows 10
Click on Start and go to the Control Panel
Click on View by and select the items to display as a Category
- Click on the Network and Internet title
Click on Network and Sharing Center
Click on Set up a new connection or network
Click on Connect to a workplace
Click on Use my Internet Connection (VPN)
Enter vpn.cis.fiu.edu under the Internet Address field
Go back to Network and Sharing Center
Click on Change adapter settings
Right click on the newly created VPN Connection and click Properties
Navigate to the Security tab then select Point to Point Tunneling Protocol (PPTP) then click OK
Click on the network icon on the taskbar and click Connect on the VPN connection
Enter you VPN Credentials
You are now connected!!
[/su_tab]
[su_tab title=”Linux” disabled=”no” anchor=”” url=”” target=”blank” class=””]
Linux VPN Client setup
Prequisites
-
- VPN registration (VPN registration page)
- Kernel support for MPPE protocol (Microsoft Point-to-Point Encryption)
- PPP daemon support for MS-CHAPv2 (Microsoft Challenge Handshake Authentication Protocol version 2) and MPPE
- PPTP software (Point-to-Point Tunneling Protocol)
- Working Internet connection
- We cannot provide that, you must setup it yourself (Please note that 33Kbps modem connection will work … but SLOW, MPPE encryption adds significient overhead ..)
- Precompiled (for RedHat 7.*) pptp-linux and ppp rpms are available at: pptpclient.sourceforge.net
- Source rpms for above are available at: pptpclient.sourceforge.net
- Patches applied to the standard RedHat packages are here: INSERT
- A tarball archive of a patched pppd source as well as the kernel modules is available at: fiu-scs
Note: You only need this tarball if you are not running redhat or debian or if you want to compile and install the packages you need from source.
Setup
Once you’ve downloaded all above software proceed (as root on your machine) to:
ppptp
[root@lisa root]# /usr/sbin/pptp-command
1.) start
2.) stop
3.) setup
4.) quit
What task would you like to do?: 3
1.) Manage CHAP secrets
2.) Manage PAP secrets
3.) List PPTP Tunnels
4.) Add a NEW PPTP Tunnel
5.) Delete a PPTP Tunnel
6.) Configure resolv.conf
7.) Select a default tunnel
8.) Quit
?: 1
1.) List CHAP secrets
2.) Add a New CHAP secret
3.) Delete a CHAP secret
4.) Quit
?: 2
Add a NEW CHAP secret.
NOTE: Any backslashes (\) must be doubled (\\).
Local Name:

This is the 'local' identifier for CHAP authentication.
NOTE: If the server is a Windows NT machine, the local name
     should be your Windows NT username including domain.
     For example:

     domain\\username
Local Name: username

Remote Name:

This is the 'remote' identifier for CHAP authentication.
In most cases, this can be left as the default. It must be set if you have multiple CHAP secrets with the same local name and different passwords. Just press ENTER to keep the default.

Remote Name [PPTP]:*

Password:

This is the password or CHAP secret for the account specified. The password will not be echoed.

Password: ************* (your NICE password)
Adding secret username * ***********

1.) List CHAP secrets
2.) Add a New CHAP secret
3.) Delete a CHAP secret
4.) Quit
?: 4
1.) Manage CHAP secrets
2.) Manage PAP secrets
3.) List PPTP Tunnels
4.) Add a NEW PPTP Tunnel
5.) Delete a PPTP Tunnel
6.) Configure resolv.conf
7.) Select a default tunnel
8.) Quit
?: 4

Add a NEW PPTP Tunnel.

1.) Other
Which configuration would you like to use?: 1
Tunnel Name: FIUCIS
Server IP: vpn.cis.fiu.edu
What route(s) would you like to add when the tunnel comes up?
This is usually a route to your internal network behind the PPTP server.
You can use TUNNEL_DEV and DEF_GW as in /etc/pptp.d/ config file
TUNNEL_DEV is replaced by the device of the tunnel interface.
DEF_GW is replaced by the existing default gateway.
The syntax to use is the same as the route(8) command.
Enter a blank line to stop.
route: add -host vpn.cis.fiu.edu gw DEF_GW
NOTE: replace DEF_GW above
with the ip address of your local gateway
route: add -net 131.94.0.0 netmask 255.255.0.0 ppp0
route:
Local Name and Remote Name should match a configured CHAP or PAP secret.
Local Name is probably your NT domain\username.
NOTE: Any backslashes (\) must be doubled (\\).

Local Name: username
Remote Name [PPTP]: *
Adding FIUCIS - vpn.cis.fiu.edu - username - PPTP
Added tunnel  FIUCIS

1.) Manage CHAP secrets
2.) Manage PAP secrets
3.) List PPTP Tunnels
4.) Add a NEW PPTP Tunnel
5.) Delete a PPTP Tunnel
6.) Configure resolv.conf
7.) Select a default tunnel
8.) Quit
?: 7
1.) FIUCIS
2.) cancel
Which tunnel do you want to be the default?: 1
1.) Manage CHAP secrets
2.) Manage PAP secrets
3.) List PPTP Tunnels
4.) Add a NEW PPTP Tunnel
5.) Delete a PPTP Tunnel
6.) Configure resolv.conf
7.) Select a default tunnel
8.) Quit
?: 8
[root@lisa root]#
Note: Above configuration encrypts and routes through the tunnel ONLY your communication channels to FIU networks. All other traffic from your machines goes unencrypted over your internet connection to the provider. Your NICE password is stored in CLEARTEXT in /etc/ppp/chap-secrets. (This could be a security problem on multiuser machines…)
Test it
Run:
[root@lisa root]# /usr/sbin/pptp-command start
You should see the output similar to the following:
Route: add -host vpn.cis.fiu.edu gw 64.129.118.41 added
Route: add -net 131.94.0.0 netmask 255.255.0.0 ppp0 added
All routes added.
Tunnel FIUCIS is active on ppp0.  IP Address: 131.94.127.*
To verify that your tunnel is running you may try:
[root@lisa root]# traceroute www.cis.fiu.edu
traceroute to leopard.cis.fiu.edu (131.94.125.219), 30 hops max, 38 byte packets
1  vpn.cis.fiu.edu (131.94.127.129)  68.169 ms  70.184 ms  80.097 ms
2  sagwa.cis.fiu.edu (131.94.133.5)  80.163 ms  79.496 ms  69.764 ms
3  leopard.cis.fiu.edu (131.94.125.219)  84.726 ms  79.591 ms  79.936 ms
[root@lisa root]#
Your first hop on the route should be named INSERT To stop the tunnel use:
[root@lisa root]# /usr/sbin/pptp-command stop
Sending HUP signal to PPTP processes...
[root@lisa root]#
To see the tunnel state use:
[root@lisa root]# /usr/sbin/pptp-command status
There is probably not a pptp tunnel up
[root@lisa root]#
(As you may see even on the above output the detection is somehow flaky …)
Note: pptp-command is not very clever: watchout for multiple starting of the tunnel …
Troubleshooting
- Are you registered?
- Have you supplied correct VPN userid and password ?
- Is your underlying internet connection working ?
- Debug your connection attempts:
- Add debug keyword in /etc/ppp/options.pptp
- Edit your
/etc/syslog.conf to contain line:
*.* /var/log/messages - restart syslog:
/sbin/service syslog restart - Watch the debug output:
tail -f /var/log/messages
during subsequent attempts
- Consult the documentation:
http://pptpclient.sourceforge.net. - What works over the tunnel?: Everything using IP should work – let me know about any exceptions you find ..
[/su_tab]
[su_tab title=”Mac OS X” disabled=”no” anchor=”” url=”” target=”blank” class=””]
Mac OS
MacOS users must use L2TP over IPSEC to connect to our VPN. As there are special security requirements, instructions are sent on how to connect when a VPN account is requested. Please contact request@cs.fiu.edu if you already have a VPN account and need MacOS connection instructions.
[/su_tab]
[/su_tabs]
Printing
Which printer can I print to?
If you do not have a printer in your office, you may use the following printers:
- ‘Press’ is a large volume black and white printer located in the printer room in CASE 376B.
- ‘Stapler’ is an all-in-one black and white printer located in the main office in CASE 354.
- ‘Clipboard’ is a color printer located in the main office in CASE 354.
Note: All of these printers support duplex (both sides) printing. Faculty are encouraged to print duplex when ever possible and only use Clipboard when their job requires a color printer.
The printer is out of toner
Please send an email to request@cis.fiu.edu and we will replace the toner as soon as possible. If it is after 5PM, it may not be replaced until the following business day. In this case, you should print to another printer in the office.
The printer is out of paper
Please send an email to request@cis.fiu.edu and we will deliver more paper as soon as possible. If it is after 5PM, it may not be delivered until the following business day. In this case, you should print to another printer in the office.
I would like to print to another printer. How can I add that printer?
These procedures will guide you in adding one of our department network printers. If you have a local printer, you will need to install the specific printer drivers and software for your local printer
Windows: Open run and type \\papermill.cs.fiu.edu\[printer name] or simply connect to our print server by typing \\papermill.cs.fiu.edu and double click the printer(s) that you would like to add.
Linux: Instructions will vary depending on your distro of Linux. The following steps are specific to Fedora but should be similar for other distros. Go to Administration and Print Settings. Choose add a printer. Choose network printer.
Enter:
If you would like to add all of our department network printers, create a file called “client.conf” in “/etc/cups”. In that file, enter “ServerName papermill.cs.fiu.edu”. You may need to restart your machine for the changes to take effect.
Mac: Go to System Preferences. Select “Print & Scan”. Click the plus (+) symbol and choose “Add Printer or Scanner…”. Select “IP” at the top. In address, enter “papermill.cs.fiu.edu”. Make sure “Internet Printing Protocol – IPP” is selected for Protocol. In Queue, enter “printers/[printer name]”. For Name, enter the name of the printer again. Make sure “Generic PostScript Printer” is chosen for Use. Choose “Add”.
Note: You may receive a message that says “Unable to verify the printer on your network”. Click “Continue”. Check the box that says “Duplex Printing Unit” as all of our network printers support duplex printing.
I would like to print from my own laptop. How can I do so?
You will need to be connected to our network to print from your laptop. You can do this by connecting to the ‘fiu-scs’ department wireless network or by connecting to our VPN server. Once you have connected to our network, you can add our network printers to your laptop and print jobs to them. For information on adding network printers, please see adding a printer above.
Lost and Found
I found something in the laboratory. Where can I turn it in?
Any found items should be taken to the laboratory managers in CASE 258.
I lost an item in the laboratory or classroom. Where can I go to see if it has been turned in?
If you have lost any items in the laboratory, you can try visiting the lost and found in CASE 258.
Wireless
Network access for laptops
Faculty can use either:
- ‘FIU_SECUREWiFi’ is the campus wireless. It is available throughout the campus and in the Engineering Campus. Once you have connected, you will need to authenticate with your MyFIU credentials.
- ‘fiu-scs’ is the department wireless here in the Knight Foundation School of Computing and Information Sciences. It is only available within the CASE building. There is no password to connect to the wireless but you will need to authenticate with your Knight Foundation School of Computing and Information Sciences credentials in a web browser.
Internet Access
Students should use the campus ‘FIU_SECUREWiFi’ wireless. Once you have connected, you will need to authenticate with your MyFIU credentials.
I found something in the laboratory. Where can I turn it in?
Any found items should be taken to the laboratory managers in CASE 258.
I lost an item in the laboratory or classroom. Where can I go to see if it has been turned in?
If you have lost any items in the laboratory, you can try visiting the lost and found in CASE 258.
Which printer do I print to in the laboratory?
- Students located in CASE 237 can print to ‘NP237’.
- Students located in CASE 241 can print to ‘Venom’.
- Students located in CASE 252 can print to ‘Pencil’.
Note: All of these printers support duplex (both sides) printing. Students are encouraged to print duplex whenever possible.
The printer is out of toner
Please send an email to request@cis.fiu.edu and we will replace the toner as soon as possible. If it is after 5PM, it may not be replaced until the following business day. In this case, you should print to another printer in another laboratory.
Accessing your files off campus
SSH
Windows: Windows users need to download an SSH client first. Students can obtain a free SSH client called PuTTY fromhttp://www.chiark.greenend.org.uk/~sgtatham/putty. Once you have downloaded and installed PuTTY, connect using the following:
Host Name: ocelot.aul.fiu.edu
Port: 22
Click ‘Open’. Once you have clicked open, you will receive a prompt for your username.
Enter your FIU username and press enter. You will then be prompted for your password. Enter your password and press enter.
Note: You may receive a PuTTY security alert saying that the server’s host key is not cached in the registry. Click ‘Yes’ to continue.
Mac: Your Mac comes with an SSH client. Search for ‘Terminal’ in Spotlight.
Type the following command and press enter:
ssh yourUserName@ocelot.aul.fiu.edu
Note: You may receive a warning saying that the authenticity of host ‘ocelot.aul.fiu.edu’ can’t be established. Type ‘yes’. You will be prompted for your password. Enter your password and press enter.
Linux: Your Linux OS comes with an SSH client. Open a terminal and type the following command and press enter:
ssh yourUserName@ocelot.aul.fiu.edu
Note: You may receive a warning saying that the authenticity of host ‘ocelot.aul.fiu.edu’ can’t be established. Type ‘yes’. You will be prompted for your password. Enter your password and press enter.
For more information on SSH and Unix in general, please visit our Unix guide and tutorials page.
SFTP
You may use a graphical tool to remotely access your files off campus.
Windows: Students can obtain a free tool called WinSCP from http://winscp.net/eng/index.php
Once you have downloaded and installed WinSCP, run WinSCP and connect to the following host:
Host name: ocelot.aul.fiu.edu
Port number: 22
User name: yourUserName
Password: yourPassword
File protocol: SFTP
Click Login
Mac: Students can obtain a free tool called Cyberduck from http://cyberduck.io/
Once you have downloaded and installed Cyberduck, run Cyberduck and connect to the following host:
Host name: ocelot.aul.fiu.edu
Port number: 22
User name: yourUserName
Password: yourPassword
File protocol: SFTP
Linux: GNOME users can use Nautilus. Click Places > Connect to Server and choose SSH -OR- download FileZilla
Host name: ocelot.aul.fiu.edu
Port number: 22
User name: yourUserName
Password: yourPassword
My login credentials do not work
Make sure you are using your Unix credentials and not your Windows credentials. If you have not logged in to a Unix server before, your username is your FIU username. Your FIU username is the first part of your email address before the ‘@fiu.edu’ and in the form: jdoe001.
If you do not know your FIU username, log into MyFIU, select Main Menu > Campus Solutions Self Service > Campus Personal Information > Email Addresses. You will see your ‘Campus’ email address in the form: jdoe001@fiu.edu. The characters before ‘@fiu.edu’ is your FIU username.
Your initial password is the first initial of your first name, followed by your Panther ID, and the first initial of your last name.
For example: A student named ‘John Doe’ with a Panther ID of ‘1234567’ would be ‘j1234567d’.
I already have an email account elsewhere. Why do I need an FIU email account?
All official correspondence from FIU and the Knight Foundation School of Computing & Information Sciences will be sent to your FIU email account.
How do I check my FIU email?
Students need to visit PantherMail at http://mail.fiu.edu
I have forgotten my e-mail password. What should I do?
To change or reset your password, visit the MyFIU web site at https://my.fiu.edu/
If you need more help, please contact the UTS Support Center online at http://uts.fiu.edu or by calling 305.348.2284.
How can I access the SCIS open computing labs in CASE and PG6?
Undergraduate lab in CASE 241 is available 24/7 when the university is open.
Graduate lab in CASE 252 is available 24/7 when the university is open.
Software Design and Development lab in PG6-106 is open:
– Monday thru Thursday from 12:00PM to 7:00PM
– Friday from 12:00PM to 5:00PM
How do I connect to the Virtual Lab computers?
Once you are on the Virtual Lab site you have the option of connecting with our web interface or using Remote Desktop to manually connect to a lab computer.
Browser connection – Vlab web connection PDF, Vlab web connection video
Manual connection – Vlab remote desktop PDF, Vlab Mac remote desktop video
I can’t log into my account with my initial password, what should I do?
To use this system you will need to activate your account by changing the initial password at https://www.cis.fiu.edu/pw. If you have previously changed your SCIS password then your account is already activated.
I am an LA/TA or a student with an incomplete and I can’t access the system even after activating my account, what should I do?
Access for students in the class is based on the official enrollment lists, which will not include folks in these categories. If you fall under this category please send us your username/panther ID and course information so we can grant you access. Send to request@cs.fiu.edu
Crestron Setup
These instructions are specifically for CASE 238 & CASE 234
Step 1. Tap the Crestron display to wake it
Step 2. Tap the Crestron display again to begin.
Step 3. Choose the source you want to work with (desktop, AirMedia, or Aux HDMI)
If you choose Desktop, use the wireless keyboard found under the Crestron display. Be sure to look for the switch on the keyboard on the top right of the keyboard. The keyboard is on when switched to green.
If you choose to use AirMedia, follow the onscreen instructions on the Newline to access it.
If you choose to use your own device, connect an HDMI cable to the part found near the NewLine display. It is approximately two feet from the ground.
Step 4. If you have chosen to use the desktop, and you have the wireless keyboard in hand, you may have to wake the screen up. Press any key on the keyboard. You should now be able to log into the desktop. Please use your KFSCIS credentials to sign in.
Step 5. If you need to use Zoom, visit zoom.fiu.edu with your preferred browser and sign in with your University credentials to download an updated exe.
Step 6. Once Zoom has started your meeting, check that your audio settings have your speakers and microphone set to “Echo Cancelling Speakerphone (TesiraFORTE)”
Step 7. You may need to adjust the angle of the camera. Go to the Crestron display and tap the camera icon at the bottom right of the display. Use the arrows to move the camera to your desired angle and use the zoom-in and zoom-out buttons until you reach the desired effect.
Step 8. When you have finished, be sure to log out of the desktop, switch-off the wireless keyboard, and place it beneath the Crestron display. Tap the red power button on the Crestron display to turn the system off.
If at any point you encounter issues, you can reach out to your friendly neighborhood KFSCIS support team for assistance. We can be reached at request@cis.fiu.edu.
Note: The wall mounted camera is not available if you choose AirMedia or AuxHDMI as a source.
Account INformation
Undergraduate Students
Students enrolled in Knight Foundation School of Computing & Information Sciences courses are automatically given an account each semester. You can use your account to login to the Windows PCs, Macs, or Linux machines in the John C. Comfort Laboratory (JCCL) undergraduate lab located in CASE 241. This access is granted for the duration of the semester only.
Your username is your FIU username. Your FIU username is the first part of your email address before the ‘@fiu.edu’ and in the form: jdoe001. If you do not know your FIU username, log into MyFIU, select Main Menu Campus Solutions Self Service Campus Personal Information Email Addresses. You will see your ‘Campus’ email address in the form: jdoe001@fiu.edu. The characters before ‘@fiu.edu’ is your FIU username.
Your initial password is the first initial of your first name, followed by your Panther ID, and the first initial of your last name. For example: A student named ‘John Doe’ with a Panther ID of ‘1234567’ would be ‘j1234567d’.
Note: If you registered late for a class, your account will be created within the next 24 hours after you have registered. Each semester your JCCL password is reset to the initial password. All accounts will expire on the last day of classes and it is your responsibility to maintain a backup of your computer files.
Account Information
Graduate Students
Students enrolled in Knight Foundation School of Computing & Information Sciences courses are automatically given an account each semester. You can use your account to login to the Windows PCs, Macs, or Linux machines in the graduate lab located in CASE 252.
Your username is your FIU username. Your FIU username is the first part of your email address before the ‘@fiu.edu’ and in the form: jdoe001. If you do not know your FIU username, log into MyFIU, select Main Menu Campus Solutions Self Service Campus Personal Information Email Addresses. You will see your ‘Campus’ email address in the form: jdoe001@fiu.edu. The characters before ‘@fiu.edu’ is your FIU username.
Your initial password is the first initial of your first name, followed by your Panther ID, and the first initial of your last name. For example: A student named ‘John Doe’ with a Panther ID of ‘1234567’ would be ‘j1234567d’.
Note: If you registered late for a class, your account will be created within the next 24 hours after you have registered. It is your responsibility to maintain a backup of your computer files.
My credentials work on the Linux machines but not the Windows PCs or vice-versa
There are two sets of login credentials. One set is for the Windows PCs and Macs and the other is for the Linux machines. If this is your first time logging in to one of the systems, your username is your FIU username. Your FIU username is the first part of your email address before the ‘@fiu.edu’ and in the form: jdoe001. Your password is the standard initial password which is the initial of your first name, followed by your Panther ID, and the initial of your last name.
For example: A student named ‘John Doe’ with a Panther ID of ‘1234567’ would be ‘j1234567d’.
It takes me a long time to login to the Windows PCs. What can I do to fix this?
The Knight Foundation School of Computing & Information Sciences uses roaming profiles. Roaming profiles allow a user’s desktop and application settings to follow them no matter which workstation they login to on the domain. This roaming profile is downloaded to the computer when you login and uploaded back to the server when you log off. The reason it takes you a long time to login is that you have a lot of data in your roaming profile.
Your roaming profile lives in a hidden directory in your home directory called “.ad-profile-win10”. In Windows, C:\Users\ is your Roaming Profile. The most common culprits for slow logins are Dropbox and virtual machines. When installed incorrectly, these can add numerous gigabytes worth of data to your roaming profile which translates to a substantial login time.
The contents of this folder should not be modified while you are logged in to a Windows PC. You will need to SSH in to one of our Unix servers and move or delete the offending folders and or files from your roaming profile.
How do I change my Windows password?
Once your logged in, press CTRL + ALT + DELETE and select the option that says “Change a password”.
How do I change my Linux password?
Once your logged in, open a terminal and type ‘yppasswd’.
Wireless Network Access
- ‘FIU_SECUREWiFi’ is the campus wireless. It is available throughout the campus and in the Engineering Campus. Once you have connected, you will need to authenticate with your MyFIU credentials.
- ‘fiu-scs’ is the department wireless here in the Knight Foundation School of Computing & Information Sciences . It is only available within the CASE building. There is no password to connect to the wireless but you will need to authenticate with your SCIS credentials in a web browser.
Which printer can I print to?
If you do not have a printer in your office, you may use the following printers:
- ‘Press’ is a large volume black and white printer located in the printer room in CASE 376B.
- ‘Stapler’ is an all-in-one black and white printer located in the main office in CASE 354.
- ‘Clipboard’ is a color printer located in the main office in CASE 354.
Note: All of these printers support duplex (both sides) printing. Faculty are encouraged to print duplex when ever possible and only use Clipboard when their job requires a color printer.
I would like to print to another printer. How can I add that printer?
These procedures will guide you in adding one of our department network printers. If you have a local printer, you will need to install the specific printer drivers and software for your local printer
Windows: Open run and type \papermill.cs.fiu.edu[printer name] or simply connect to our print server by typing \papermill.cs.fiu.edu and double click the printer(s) that you would like to add.
Linux: Instructions will vary depending on your distro of Linux. The following steps are specific to Fedora but should be similar for other distros. Go to Administration and Print Settings. Choose add a printer. Choose network printer.
Enter:
ipp://papermill.cs.fiu.edu/printers/[printer name]
If you would like to add all of our department network printers, create a file called “client.conf” in “/etc/cups”. In that file, enter “ServerName papermill.cs.fiu.edu”. You may need to restart your machine for the changes to take effect.
Mac: Go to System Preferences. Select “Print & Scan”. Click the plus (+) symbol and choose “Add Printer or Scanner…”. Select “IP” at the top. In address, enter “papermill.cs.fiu.edu”. Make sure “Internet Printing Protocol – IPP” is selected for Protocol. In Queue, enter “printers/[printer name]”. For Name, enter the name of the printer again. Make sure “Generic PostScript Printer” is chosen for Use. Choose “Add”.
Note: You may receive a message that says “Unable to verify the printer on your network”. Click “Continue”. Check the box that says “Duplex Printing Unit” as all of our network printers support duplex printing.
I would like to print from my own laptop. How can I do so?
You will need to be connected to our network to print from your laptop. You can do this by connecting to the ‘fiu-scs’ department wireless network or by connecting to our VPN server. Once you have connected to our network, you can add our network printers to your laptop and print jobs to them. For information on adding network printers, please see adding a printer above.
My login credentials do not work
Make sure you are using your Unix credentials and not your Windows credentials. If you have not logged in to a Unix server before, your username is your FIU username. Your FIU username is the first part of your email address before the ‘@fiu.edu’ and in the form: jdoe001.
If you do not know your FIU username, log into MyFIU, select Main Menu > Campus Solutions Self Service > Campus Personal Information > Email Addresses. You will see your ‘Campus’ email address in the form: jdoe001@fiu.edu. The characters before ‘@fiu.edu’ is your FIU username.
Your initial password is the first initial of your first name, followed by your Panther ID, and the first initial of your last name.
For example: A faculty member named ‘John Doe’ with a Panther ID of ‘1234567’ would be ‘j1234567d’.
I already have an FIU email account. Why do I need a Knight Foundation School of Computing & Information Sciences email account?
All official correspondence from the Knight Foundation School of Computing & Information Sciences will be sent to your Knight Foundation School of Computing & Information Sciences email account.
How do I check my Knight Foundation School of Computing & Information Sciences email?
Faculty can visit http://mail.cs.fiu.edu to check their mail on a web browser, however, we recommend you setup your mail account on a mail client such as Mozilla Thunderbird.
Mail server configuration
Incoming mail server
Server Name: imap.cs.fiu.edu
Connection Security: SSL
Port: 993
Outgoing mail server
Server Name: smtp.cs.fiu.edu
Connection Security: STARTTLS
Port: 587
I do not know or have forgotten my password
Send an email to request@cis.fiu.edu and the staff can assist you with resetting your password.
How can I forward mail to my @cs.fiu.edu account somewhere else?
You can use procmail to do this (see below) but there is a simple way. Create a file in your home directory (U drive) called .forward (it starts with a dot, so it a hidden file) in that file you place the email address(s) you want your email to forward to.
If you are remote, you can login to wolf.cs.fiu.edu to do this.
Setting up Procmail on your FIU-SCIS Account
Introduction
Procmail is a tool that is designed to filter your mail. In other words, it permits you to send your Email to different locations depending on its content. This is very handy because you can use it to do things like:
- Split mail from different places into different folders
- Delete mail from undesireable sources
- Forward certain email to a script to process it further
- Forward certain email to another address so you can read it elsewhere
- and much more
Setting up Procmail
In the past, you used to have to use a “.forward” file to use procmail. You no longer have to do this, since ALL email is delivered using procmail. The only file you have to worry about is your .procmailrc file, which is located in your UNIX home directory. The first step is to create a mail directory inside your home directory, if you don’t already have one. Just type, in UNIX:
cd ~
mkdir mail
chmod 700 mail
The chmod command keeps other people from poking around in your mail directory, but allows you to access it. The second step is to actually create the file. For instance, in UNIX, type:
pico .procmailrc
(or emacs, or vi, or whatever editor you want; pico is easiest for beginners, though) Then, paste in the following. This is the procmail header, which defines various operating parameters.
# .procmailrc begins here
PATH=$HOME/bin:/usr/bin:/usr/ucb:/bin:/usr/local/bin:.
MAILDIR=$HOME/mail # Make sure it exists
DEFAULT=/var/mail/$LOGNAME
VERBOSE=off
LOCKFILE=/var/mail/.proclock.$LOGNAME
LOGFILE=$MAILDIR/.procmail.log
# Recipes go here
#
# .procmailrc ends here
Procmail automatically replaces “$LOGNAME” with your username and “$HOME” with your home directory. The LOCKFILE is used by procmail to keep two different procmail processes from accessing your mailbox at the same time, causing corruption. The LOGFILE contains a log of procmail transactions; this is handy if something is not working and you want to find out why. DEFAULT specifies the destination of all Email that does not match any recipes. Since there are no recipes yet, all your incoming email will go to DEFAULT, which is your mail spool.
Creating Recipes
A recipe is a rule that tells procmail what to do with a particular Email. Recipes must be placed after the header in your .procmailrc file, IE, after the “Recipes go here” comment in the above example. Here are some examples of useful recipes. Let’s say we have a jerk with the Email address “jerk@microsoft.com” who is sending you lots of annoying Email, and you want to stop seeing the messages. This recipe will do that:
# Begin procmail recipe
:1
^From.*jerk\@microsoft\.com.*
/dev/null
# End procmail recipe
Explanation:
[First Line] :1
There is always a : on the first line of every recipe. The number (in this case 1) after the : specifies how many rules follow for this recipe. All the rules must match for the recipe to take the message.
[Second Line] ^From.jerk\@microsoft.com.
This line will match any Email that contains the above text. Since the From header is integral to most Emails, and contains the sender’s Email address, that line will match messages from “jerk@microsoft.com”. The line is a regular expression, so standard UNIX regular expression syntax applies.
[Third Line] /dev/null
The last line in a recipe tells procmail what file to send the message to. It is called the “action line”. In this case, we’re sending the message to /dev/null, which is the “bit bucket”, all data sent there is deleted. Remember that jerk@microsoft.com could always change his email address, or find another ISP. This won’t necessarily stop someone from harassing you. It is best to not brag about the filter; if the person doesn’t know his email is being deleted, he will likely continue sending the messages and wonder why you aren’t replying!
Example: Carbon Copies
Let’s say you want to do something with a message, like file it away, but still want the message to continue being processed by the remaining recipes. To do this, add a “c” after the number in the : line. For instance:
# Begin procmail recipe
:1 c
^From.*pelina\@cs\.fiu\.edu.*
/homes/$LOGNAME/mail/pelina
# End procmail recipe
The above recipe will save a CARBON COPY of all messages from pelina@cis.fiu.edu to the “pelina” mail spool file, and the message will still be delivered to your INBOX, provided there are no more recipes after this one that match that message and do something else with it.
Example: Forwarding
You can also use procmail to forward your mail. Say you get a lot of personal email at your school address from friend@yahoo.com, and you don’t want it distracting you at work. You can quietly forward that to your personal email (say it’s guru@foo.org) with a rule like this:
# Begin procmail recipe
:1
^From.*friend\@yahoo\.com.*
! guru@foo.org
# End procmail recipe
The “!” in the action line tells procmail to send the message to that address.
Example: Filing certain messages into folders
Here is another example of a procmail recipe; this one will take all messages from pelina@cis.fiu.edu and place them in the mail folder “pelina”.
# Begin procmail recipe
:1
^From.*pelina\@cs\.fiu\.edu.*
/homes/$LOGNAME/mail/pelina
# End procmail recipe
Since $LOGNAME is replaced by your username, messages from pelina@cis.fiu.edu will be stored in the mail spool file “/homes/username/mail/pelina”, which you can access from pine and/or imap
Going on Vacation? Here is how to setup your vacation mailer.
If you will be away from the office for a while, you can set up vacation mode. This means that anyone who emails you will receive a message telling them that you are on vacation and will read your mail when you get back.
Setting up vacation mode requires minor UNIX usage; if you are not familiar with UNIX, we would be happy to set this up for you; simply E-mail us at request@cs.fiu.edu. There are two ways to set up vacation mode. The simplest way is to just use the “vacation” command. However, if you have a complex .procmailrc file (and you will know if you do), you may want to use the .procmailrc method.
vacation command
SSH into wolf.cs.fiu.edu and run command:
vacation
You will be presented with a text editor containing a default vacation message. Edit it to your tastes, then save the message. That’s it! Vacation mode is now set up. Feel free to test it by sending an E-mail to yourself; you should get an immediate response with your vacation message.
When you return, to turn off vacation mode, simply ssh into UNIX and type:
rm -f ~/.forward
This will remove the vacation script from your .forward file and return you to normal mail processing.
The .procmailrc method
If you have a .procmailrc file to sort your E-mail, you will want to use this method. It will work the same way for folks that E-mail you, but your mail sorting will be preserved. To set this up, simply add this section before the first rule in your .procmailrc file:
#
# vacation handler
#
:0 Whc:.vacation.lock
*!^FROM_DAEMON
*!^X-loopity-loop: yourusername@cs.fiu.edu
*^TOyourusername.*
| formail -rD 8192 $HOME/.vacation.cache
:0 ehc
| ( formail -rA”Precedence: Junk” \
-A”X-loopity-loop: yourusername@cs.fiu.edu”;\
cat $HOME/vacation-message.txt ) | /usr/lib/sendmail -oi -t
Replace all instances of ‘yourusername’ with your actual SCS username. Then, edit the file vacation-message.txt in your home directory, and place your vacation message in it. That’s all there is to it! Vacation mode is now set up. When you return from vacation, simply edit your .procmailrc file and remove or comment out the above section, and delete the file ~/.vacation.cache and you will return to normal mail processing.
Need to Recover a File?
Did you accidentally delete a file from your home directory (U: drive)? Do you need to restore a file from an earlier point in time? We strongly urge our students and faculty to store your data in your home directory (U: drive). This network drive is backed up regularly and snapshots of your home directory are taken daily every morning.
If you need to restore a file, follow the steps below:
- SSH to the server where your home directory lives. Generally, faculty, staff, and graduate students are on bear.cs.fiu.edu. Undergraduate students are on buffalo.cs.fiu.edu.
- For Faculty and Staff and Graduate students – Once you are logged in to bear.cs.fiu.edu, type the following command: cd ../../.zfs/snapshot/n-backup-YYYYMMDD/users/[username] Where YYYYMMDD is the date you would like to go back to and [username] is your username.
- For Students – Once you are logged in to buffalo.cs.fiu.edu, type the following command: cd ../../.zfs/snapshot/n-backup-YYYYMMDD/homes/[username] Where YYYYMMDD is the date you would like to go back to and [username] is your username.
There you will find your home directory as it was at the time of the snapshot that day. If you would like to restore a file or folder, simply type:
# cp [filename] ~
# cp -r [folder] ~
That will copy a file from the snapshot location to your home directory. If you are copying a folder, you must use the ‘-r’ option.
Webspace
The Knight Foundation School of Computing & Information Sciences provides our students with a webspace available to host your own website. Create a directory called “public_html” in your U: drive or UNIX home directory and place the website files in there.
Your website is accessible as: http://www.aul.fiu.edu/~yourUserName
On Ocelot:
# chmod 711 ~
This sets your home directory world searchable
# chmod 755 ~/public_html
This sets your public_html directory world readable
Advising Conference Room
Troubleshooting Tips
There are 2 ways to power on the monitor.
- With the “Remote”:
- The “Remote” is being held at the front desk with the student assistant.
- Without the remote:
- There are buttons on the back of the monitor. The location of these buttons can be found using the labels which are in front of the monitor. (See image below)

- The power button is circled in red. The buttons are on the back of the monitor approximately 3 inches above its label.
- There are buttons on the back of the monitor. The location of these buttons can be found using the labels which are in front of the monitor. (See image below)
Connecting wirelessly to screen share
Once the monitor is on, use the input with AirMedia. This will provide an IP address and display further instructions for students to complete the screen share process.
Connecting to Zoom meetings
- Use the input with the Mac PC for Zoom. Be sure to power on the mouse and keyboard.
- The mouse takes appx 3 minutes to sync. Please be patient.
- Be sure to power off the mouse and keyboard once you are done.